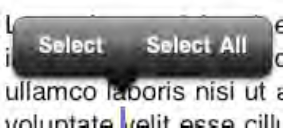
Anyone
who has edited text on an iOS device is probably familiar with the
text-editing menu that appears at various times, hovering over the text
area in response to user actions, as shown in Figure 1.
This is a context-sensitive menu that displays only items relevant to
the current selection (unlike menus in Mac OS X, where unavailable
items are grayed out).
Starting with i OS 3.2, it's
now possible for developers to tap into this functionality. You can set
up a list of your own menu items that will be added to the menu, and
also implement functionality to enable and disable your menu items on
the fly, depending on the current selection or any other factors you
want to take into account. (You can't do anything about the menu items
that the system provides.)
The gateway for accessing all this functionality is the UIMenuController class. UIMenuController is a singleton class, whose single instance is used across all text views in your app. The idea is that you create one or more UIMenuItem instances (each of which specifies an action and a title), put them in an array, and pass them off to the UIMenuController instance. When it's time to display the menu, UIMenuController
will use the responder chain to locate an object that implements the
method for each menu item, and determine whether or not that item
should be displayed.
To demonstrate this in
action, we'll create a quick little test-bed app. This app won't really
do anything apart from letting us edit a piece of text, and attach a
menu item of our own design to the menu controller. The menu item will
let users select a URL in their text and open that URL in Safari.
Start by creating a new view-based project in Xcode, targeted at iPad. I named my app TextMangler. The project that Xcode creates will have a TextManglerViewController class. Add the following instance variable to TextManglerViewController.h, between the two curly braces in the class declaration:
IBOutlet UITextView *textView;
Now open TextManglerViewController.xib in Interface Builder, and drag a UITextView object into the view, filling it completely. Then control-drag from the File's Owner icon to the text view and select textView from the small context menu that appears. This GUI is done, so save your work and go back to Xcode.
TextManglerViewController.m
has a number of predefined methods that were put there when the project
was created. You can leave all of those in place, and just add
definitions for the few methods described here. Start by defining the viewDidLoad method, where we do our initialization. This code creates a menu item, and then passes it along to UIMenuController so that it can appear alongside the other menu items.
- (void)viewDidLoad {
  [super viewDidLoad];
  UIMenuItem *menuItem = [[[UIMenuItem alloc] init] autorelease];
  menuItem.title = @"Open URL in Safari";
  menuItem.action = @selector(openUrlInSafari:);
  [UIMenuController sharedMenuController].menuItems = [NSArray
    arrayWithObject:menuItem];
}
Note that in defining a UIMenuItem,
we specify an action, but not a target. The target is determined
dynamically by traversing the responder chain, sending each object in
the chain the canPerformAction: method until one of them returns YES
(or until there's nothing left in the responder chain to ask). Since
this controller class will be in the responder chain, we'll implement
the method here.
The canPerformAction:
method first checks to make sure that the relevant action is being
asked about, and then checks the text view's selected text to see if
it's an URL that can be opened. If so, it returns YES. If it doesn't know what else to do with this query, it passes the call along by calling the superclass's implementation.
- (BOOL)canPerformAction:(SEL)action withSender:(id)sender {
  if (action == @selector(openUrlInSafari:)) {
    NSString *selectedText = [textView.text substringWithRange:textView.selectedRange];
    NSURL *url = [NSURL URLWithString:selectedText];
    return [[UIApplication sharedApplication] canOpenURL:url];
  }
  return [super canPerformAction:action withSender:sender];
}
NOTE
You might think that you should explicitly return YES or NO
here (depending on how you think about it) if you don't know what to do
with the action in question, but you would be wrong. The canPerformAction: method is called for each and every menu item, so you would potentially be enabling (or disabling) all of them, not just yours!
Finally, here's the action method itself, which is called when the user selects the menu item we created.
- (void)openUrlInSafari:(id)sender {
  NSString *selectedText = [textView.text substringWithRange:textView.selectedRange];
  NSURL *url = [NSURL URLWithString:selectedText];
  [[UIApplication sharedApplication] openURL:url];
}
Build and run your app, and
a big text view will fill the screen. Go ahead and play with it,
pressing and holding somewhere, selecting some text, and so on. You'll
see the same menu items as usual. Then type in a URL, such as http://apress.com, and select the text. Now you get the extra menu item, as shown in Figure 2. Touching it should launch Safari and bring up the page.

Since UIMenuItemController is shared throughout your application, the menu items you add to it will be available in every UITextField and UITextView
that the user sees. Since the menu items are enabled and disabled using
the responder chain, you can decide the level of granularity you want.
Use canPerformAction: to enable
items in your app delegate if you want them to always be enabled, or in
individual view controllers if you want more fine-grained control.